WRITTEN BY Kyle Stockbridge
apprentice, BOOM BOX POST
2025 is officially here! One of my New Year’s resolutions is to make a conscious effort to improve my speed and efficiency in my sound work. It’s easy to get stuck in your old ways, especially if you’ve been working with Pro Tools for quite a while. Since there are a million ways to achieve the same result, what better time than now to start exploring other techniques and form new habits in your workflow?
Here are a few tricks to get you started. Seasoned editors and mixers may already know a few of these, but I hope there’s at least one thing in here for everyone!
customize personal keyboard shortcuts
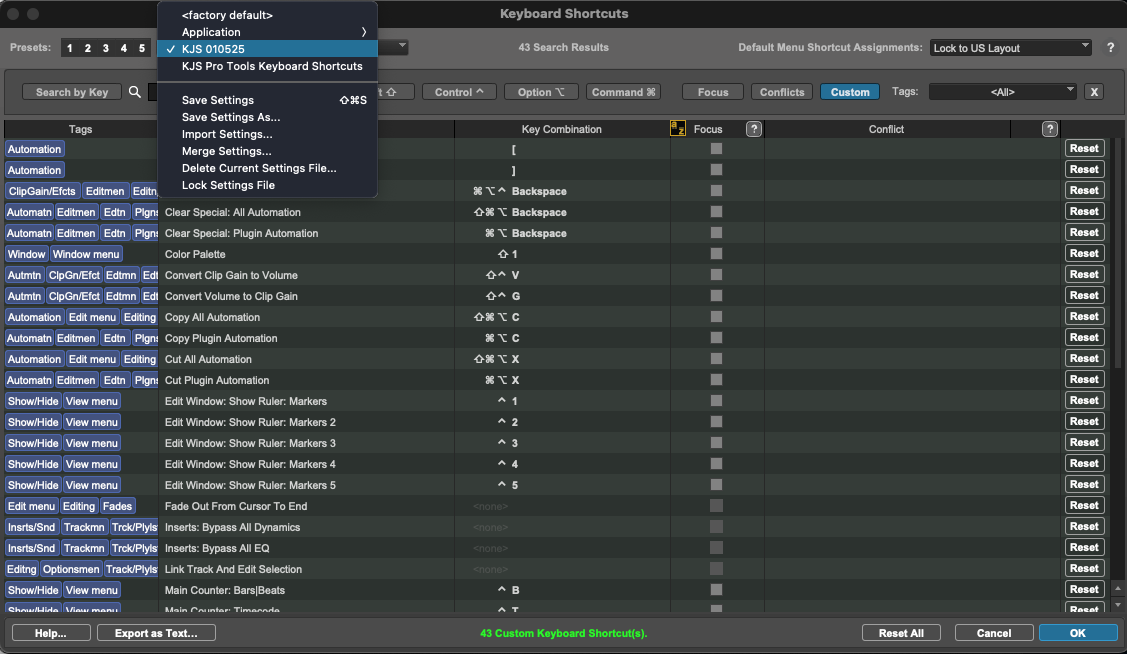
This is a no brainer. It’s no secret that mastering keyboard shortcuts is one of the best ways to improve speed and efficiency, but only somewhat recently (Pro Tools Version 2022.4) have users been able to create custom shortcuts!
Anytime I find myself wishing there was a shortcut, or if I discover an overly complicated shortcut, I’ve made it a habit to create a custom shortcut right then and there.
Use Ctrl+Shift+K (Start+Shift+K on Windows) to open Keyboard Shortcuts and start your collection of custom shortcuts
Need to work on a different machine? No problem: use' ‘Save Settings As’ to save your custom shortcuts and recall them on another machine.
TAB TO TRANSIENT SENSITIVITY
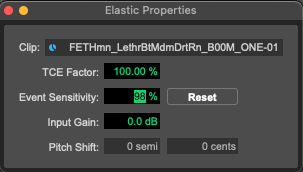
Using the tab to transient function can be a huge time saver (when it works). Have you ever tried to tab to a transient but the playhead refuses to cooperate? Maybe it’s latching onto an area with seemingly no transient… or simply skipping over an obvious transient for mysterious reasons. Try changing the Event Sensitivty within Elastic Properties!
With the clip selected, use Opt+Numpad 5 (Alt+Numpad 5) to open the elastic audio properties and try increasing or decreasing the “Event Sensitivity.”
Keep in mind that this only works on a clip by clip basis and the track must have elastic audio enabled. This trick still seems to have its quirks. I get the best results by clicking roughly in front of a transient before tabbing to it.
Don’t Sleep on universe view
I rarely use the Universe View but I’m trying to implement it more when I see fit. One scenario that it comes in handy for is when I’m sifting through a very busy session, hunting for specific SFX builds.
Use the shortcut Opt+Numpad 7 to show/hide Universe View. I find that dragging the universe window around my session in conjunction with R and T zoom keys feels much smoother and more controlled compared scrolling vertically and horizontally with the scroll wheel.
Utilize numerous markers rulers
For those that use Markers to leave notes in their sessions, this one is for you! I find that my sessions can get overwhelmed with Markers to the point it clutters up the visibility of the session. As of version 2023.12, Pro Tools gives us five Markers Rulers and they can be renamed whatever you’d like!
I recently cut foley, backgrounds, sfx and dialogue on a project and used a different ruler (essentially a lane of Markers) for each food group. This allowed me to focus solely on the set of markers for the specific food group I was working on without being bogged down by extraneous markers.
Bonus Tip: Create a custom keyboard shortcut to toggle the visibility of your Rulers! I used Ctrl+Numpad 1-5 for each Ruler.
sync clips using sync points
Hopefully you’ve been using Ctrl+Click (Start+Click on Windows) to instantly sync the head of a clip to your playhead position, but what about syncing a particular location within that clip? Try using sync points! This can come in handy for syncing whooshes or stingers that have a longer lead into the apex of the clip.
First, find the part of the clip you want to sync and use Cmd+, (Ctrl+, on Windows) to set the sync point within the clip. You can adjust the sync point location with the grabber tool if you need. Then place your playhead at the frame you’d like to sync the clip to and use Ctrl+Shift+Click (Start+Shift+Click on Windows) to instantly sync the clip at the sync point. To remove sync points, use Opt+Click (Alt+Click on Windows) on the sync point.
CUT IN CONFIDENCE with timing lock and edit lock
When working on heavy scenes that call for tons of coverage, things can get lost in the mix (no pun intended). Have you ever listened back to your edit and noticed something had shifted or worse: disappeared entirely? After finishing an intricate build, the last thing I want to worry about is accidentally altering it while I’m jamming away at other builds. Timing Lock and Edit Lock can keep your fear at bay while you continue to work.
Timing Lock: Select clips and use Ctrl+Opt+L (Start+Alt+L on Windows) - This will keep your clips locked in time to the grid, but will still allow you to edit such as trim, fade, change clip gain, move to other tracks etc.
Edit Lock: Select clips and use Cmd+L (Ctrl+L on Windows) - This will keep your clips safe from ANY accidental editing. One thing I like in particular about edit locked clips is that it gives a warning if you’re about to import a new sound (from Sound Miner) that will accidentally overlap with or cut into existing clips.
Timing Locked icons on clips
Edit Locked icons on clips
CUSTOM TRACK Visibility WITH MEMORY LOCATIONS
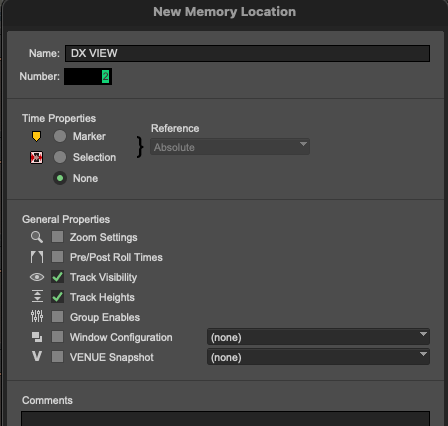
For me, the easier my session is to look at, the easier it is to focus on the work in front of me. Our sessions can become overwhelmed with so many tracks and so much audio, I find it can slow me down. Another way to reduce this clutter could be to use custom Track Visibility with memory locations. Use Numpad+Enter as you would with a Marker, but change the Time Properties to “none” and instead check Track Visibility.
In the example below, I set up my memory locations for the capability to view each food group individually, but you can use this technique to view any set of tracks you like! Below you can also see that I’ve set the Memory Location # to the views I use the most with “ALL VIEW” as #1. We can use the Keyboard shortcut “. + Numpad # + .” to quickly recall the track view. So using the example below, if I just wanted to view the dialogue tracks in my session, I’d use the shortcut “. + Numpad 2 + .”
I hope you picked up a new trick!
Now even if you’re aware of these techniques, it’s another thing to master them… And even if you’ve mastered them, I hope this at least inspired you to think about new ways you can integrate these techniques and others into your workflow. Here’s to breaking bad habits and forming new ones in 2025! Cheers.
If you enjoyed this blog, check out these:
TOP TEN SECRET PRO TOOLS KEYBOARD SHORTCUTS
LUNCH AND LEARN: DESIGNING CUSTOM SOUND EFFECTS FROM A LIBRARY
LUNCH AND LEARN: ADVANCED PRO TOOLS SHORTCUTS, TIPS AND TRICKS


