WRITTEN BY CAROL MA
Sound Effects EDITOR, BOOM BOX POST
When starting out as a freelance sound designer, you often have to work on a budget. Many effects are usually compromised; a large one being foley. Not everyone has access to a foley stage or has the budget to rent one out and hire a walker. A good alternative to filling in the footsteps of foley is to do it digitally. The most well-known plug-in that is used in digital foley is Kontact, a sampler from Native Instruments. Although the plug-in is great in its own rights, it has a hefty price tag for new sound designers. With inspiration from my colleagues, I searched for an affordable sampler that can also be used for digital foley and came across one that is often overlooked: Structure Free.
Structure Free is a sampler plug-in from AIR creative collections, which comes as package when purchasing Pro Tools.
Because they are both samplers, using Structure Free for digital foley is not all that different than using Kontact; the main difference is just the setup. For Structure Free, I found that having samples made and organized in a folder on the desktop is the most convenient way to start off. This point is one of the trickier parts of using Structure Free. The plug-in does not allow users to drag the samples onto the keyboard as a way of assigning them and creating patches. This makes it a bit more complicated. When creating the samples, you need to assign the sample to the note in the name.
For example,
Concrete FS 1_C1
Concrete FS 2_D1…
After doing this step, we can move onto creating a patch. When we first open Structure Free, we are given a preset patch with a sine wave. Because it is not needed, I just deleted the patch by right clicking and removing it.
Next, go to the “Browser” section and find the location of all the samples we made on the desktop.
Once found, simply select the samples we want and drag in onto the Patch section.
This should prompt an import window to pop up. Some adjustments that we need to make would be to set the root key from name. Here I often put it on “[note]postfix.” By making this change we should see that the “RootKey” in the far right section of the window shifted from “C3” to the notes we assigned in the name earlier. Once everything seems okay, a new patch should be created with the keys we assigned brighten on the keyboard. From this point, you could go on to start walking your digital foley or play around with Structure Free.
Once the patch is selected, we can adjust the parameters. In the patch box we have a box to rename the patch, a slider to controls the volume of the samples, “S” for solo, “M” for mute, and a pan section, which is the fader with the two triangles.
A note to make: if you want to make multiple patch boxes, make sure the “MIDI CH” is set to the channel you have routed in Pro Tools, which is often defaulted to A1.
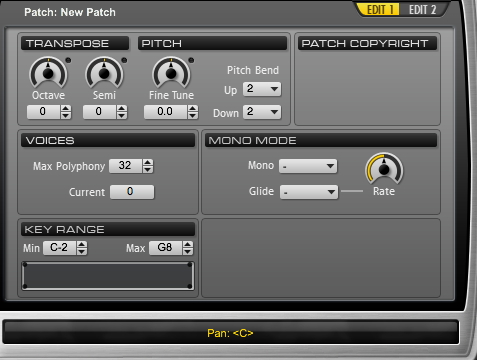
In the “Pitch” section, we can adjust the pitch of the samples. I felt I could hear a more notable difference when adjusting the “pitch bend” rather than the “fine tune.” The only unfortunate feature is that adjusting the pitch will affect all of the samples in the patch. So if you have different surfaces or characters on different octaves of the same patch, the pitches of those will be adjusted as well.
The transpose section allows you to move your samples up or down an octave, or even a semi-tone but adjusting the semi tone gets confusing and is used more in music. Like pitch, these adjustments affect the patch as a whole.
I felt the other parameters pertained more to music rather than foley, so I decided not to go in depth with these parameters.
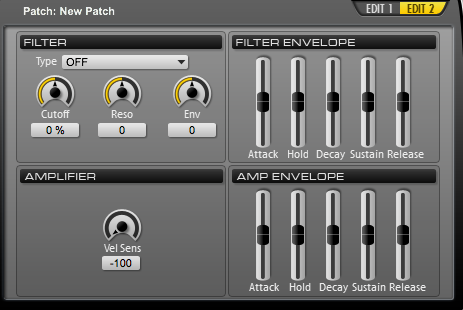
For the Edit 2 section, I once again felt that this section would be more useful in a musical sense rather than foley, so I did not really go in depth in this section. But there are a few things that I still played around with. The main adjustment I used was the amplifier knob. This adjusts the velocity ratio of the samples from the MIDI keyboard, if you are using one. I turned this knob all the way down to -100%, simply because I wanted all my footsteps to be at a consistent level.
Although I did not really use the filter section, I could see it being useful, mainly the high pass filter and the low pass filter. I would most likely use it to create a different sound for characters without having to recreate a whole new set of samples. For example, in one of our show the characters shrink. Some advice my colleague gave me was to cut off the low end to retain the original sound but make them sound lighter or smaller. In Structure Free it would be as easy as popping in a high pass filter.
Earlier on I mentioned assigning different surfaces to different octaves. I felt that I should make some comments on this section also, because it was a bit tricky. One advice is, once again, labeling the sample; but on a different octave.
Ex:
Concrete FS 1_C1
Wood FS 1_C3…
Another advice is to drag all the samples you want to use in a patch, regardless of surface, in the beginning. If you realize later that you want to add a surface, you would have to drag all the samples into the patch again. Surface Free will replace your patch with whatever you drag in. For example, if I made a patch with three different surfaces on different octaves and then decided to drag in another set of samples separately, it will reset the whole patch and only have the samples I just dragged in. To counter this, the easiest way is to pick everything you need and pull them all in or to make a new patch box so you don’t reset the one you have already made.
Other fun little tidbits in Structure Free include a note bar located above the keyboard. I like listing the order of surfaces in this area because Structure free does not list the name of the sample you are playing.
A final note I have about Structure Free is that it does not allow you to save patches separately and reload them, because it is a free version of AIR Music Tech’s Structure. However, it does keep the patches in the session in Pro Tools if you save in Pro Tools.
Overall the plug-in has its quirks which can be a bit irritating to adjust to. Once you get the hang of it, which won’t take too long, it is a good alternative to Kontact for sound designers who are starting out.


